Friday, September 10, 2010

The New Fire Hydrant


Friday, September 10, 2010

Thursday morning I worked with Trish getting the John Henry ready for it’s new home. We were almost done when Jason showed up! He was in town for the big Alabama - PennState game. It was so good to see him again. He is doing so well in his career. It makes me happy to see things working out so well for him.

Once home I contacted the freight company on the fire hydrant. It arrived but they could not find it. The man I spoke to told me he did not want me to head out to Birmingham till he knew exactly where it was. He called me back around two in the afternoon. They had it, come on up!!

I did a Google map search so I knew where I was going. Setting up the Garman I headed out. The freight company is located way out by the airport in a run down industrial area. Long loading docks with trucks backed up were behind locked chain link fences. I was at the wrong gate and had to backtrack a bit. Got onto the site and found my way into the office. It was madness: Invoices stacked all over, huge files, phones ringing, “That shipment is in Nashville, it will be here tomorrow morning. Do you want us to ‘redball’ that to you?” patiently said the capable worker.

I met with Mike whom I spoke with earlier. He told me to drive to end of the dock and to park to the right or left of the ramp: “If the brakes go on the tow motor I don’t want to hit your truck.”

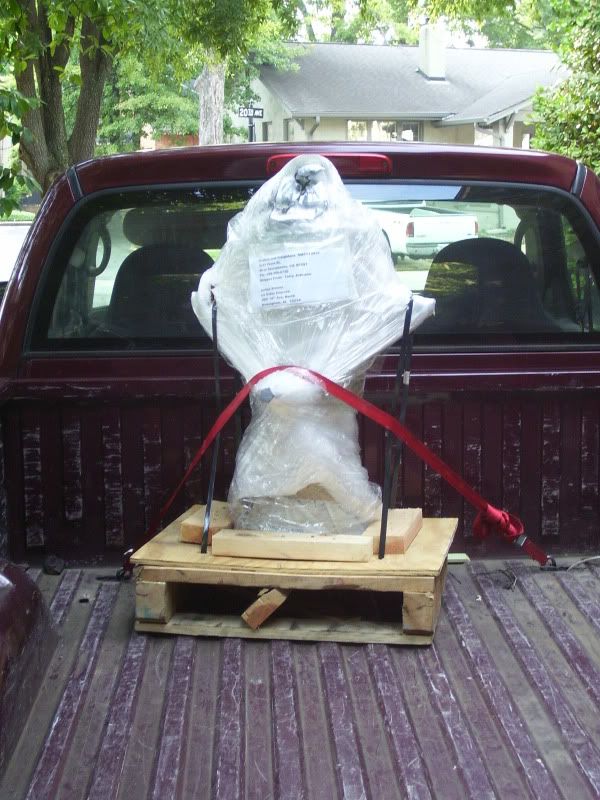
While waiting I programmed the Garman for Harbor Freight to stop on the way home. Sure enough, I heard the tow motor approaching with a small pallet holding the upright fire hydrant! What a good job of packing. Craters and Freighters gets the highest marks from me! I strapped it to the bed of the truck and headed out: The final lap in this journey for the hydrant.

It was nearly 4:00 and rush hour traffic was just getting started. If I detour to Harbor Freight, I’ll be in even worse traffic. UGH! I decided to just head for home.

The GPS went nuts when I missed the turn to I-65. I unplugged the damn thing! Traffic was so bad I did not want ANY distraction.

Friday I’m going to a party and am supposed to bring a mess of cole slaw. I needed to get some food shopping in. My mainstay market Publix by the University was out of the question. The easiest thing to do was to exit at 73 and go the Food World there. I’ve not been there in ages. It was kind of dirty and run down. Glad I was just was getting Mayo, Cabbage, celery seed, yogurt ice cream, and sourdough bread. The sourdough bread was to celebrate the San Francisco hydrant to its new home!

Using my trusted old 2x6’s salvaged 30+ years ago from an old Lockport house I made a ramp to slide the hydrant off the truck. A moving dolly carted it to its resting spot for now. Now I can check it out in detail. There has to be 100+ years of paint on this. I can make out a bit of cast information but it is all so painted over deciphering it is impossible.

With the hydrant safely off the truck and on the back patio I fixed up a steak smothered in onions and butter. After a hot shower I splurged on some Vanilla Yogurt drenched in home-made blueberry sauce from Peter and Heather. I ate that on the porch swing with Stumpy on my lap. He had some tastes of the yogurt. The cicadas were in full chorus, the street was fairly quiet and the ceiling fan had the air stirred up enough so the mosquitoes stayed away. It was the perfect way to cap off the day.

I just checked out the paint thickness of paint chip with my micrometer. It “miked out” to nearly 2 millimeters thick.

Using paint remover and the blowtorch I was able to remove enough paint so I could make out the information: RISDON IRON WORKS SF CAL. I was hoping to find a date in that insignia but no luck. The paint obscures so much detail, there might be a casting date hidden there someplace.

The main source for fire hydrant information is at: http://firehydrant.org/. There is no information on the Risdon Iron Works manufacturing hydrants. Could this be a rare hydrant cast by Risdon, or a hydrant personalized for the Risdon site?

This will have to be researched more. Now, I need to contact some members from the Brick Collectors Club in California for some California pavers. I want the base for this hydrant be constructed from period street bricks that could have been in San Francisco. Who knows this hydrant could have been in use during the 1906 disaster!

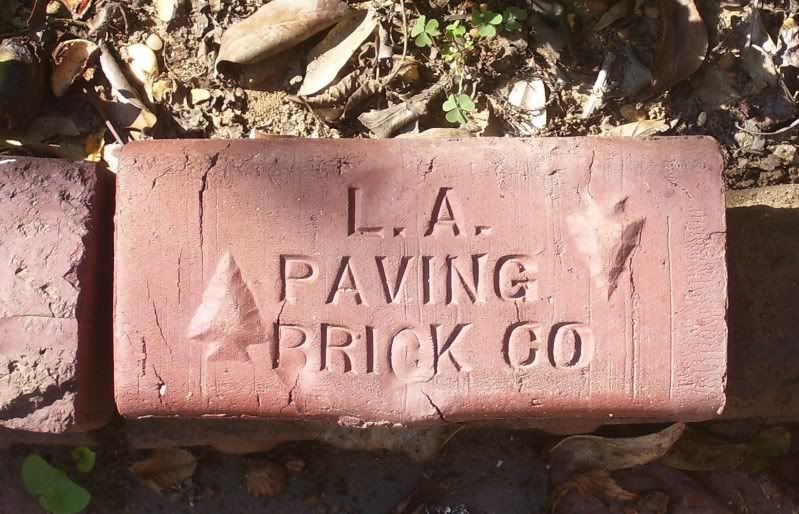
From what I have read, there was not good clay for street pavers in the San Francisco area and most of the street brick were imported in: mainly from Los Angeles. I have one LA street paver. West coast bricks don’t turn up in the east unless hauled out by a collector!
Monday, September 6, 2010

Free Long Distance / Dealing With Wingnuts


Monday, September 06, 2010

The world is so connected today, it is hard to think back forty some years ago and realize things were not always so. The phone company was a monopoly pretty much everyone hated.

Way back when you did not own your telephone, you paid rent on it every month. The cheapest phones were the black wall mounted rotary dial phones. In the mid 1960’s when push button phones came out that was an upgrade with added costs. If there was more than one phone on the line you had to pay for another phone rental. There were stories circulating how the phone company would test the lines to find those who had illegal hook ups and fine them.

The only reason you called long distance was for an emergency like a death in the family. In our house the egg timer was turned over so as to not go over the initial three minute time. If it was just important information, you called after 7:00 p.m or on Sunday for a cheaper rate. I had a code all set to be able to get around the charges when doing my road trips. To announce a safe arrival across the miles I would make a person to person call to a designated person (Usually our hated Junior High Guidance Counselor) to my friends. That would signal my safe arrival home and of course that dreaded person was never there to take the call and incur a charge!

As I understand the history of the phone system, Bell Systems had total control to what could be hooked up to their phone lines. Naturally they forbid anything but their own equipment to be used. It was when answering machines started to become commonplace Bell had to relent and allow others equipment to be attached to their lines. All Hell broke loose after that.

I use my landline for my internet connection, local calls, and the alarm system. For long distance calls I use a Sam’s Club card punching in a code for each call. I don’t use long distance enough to warrant getting a specialized plan with free weekend minutes and other add-ons.

Scott got me hooked up to Google Voice back in January. I put an account together but never used it much. It was the wrong numbers at 2:00 a.m. that stopped me from handing out that Google number out.

Last week I got an invite from Google to download a file which would allow me to use my internet connection as a phone line. I could call anyplace in the country for FREE! I downloaded the file and forgot all about it.

I was cleaning up my computer desk and found the microphone that came with the desktop. Debbie and I did a quick walk of the neighborhoods this morning. While she was on the front porch I called her cell phone from my computer. It worked!

I made free long distance calls to friends and family this morning. What a feeling to be able to talk and not worry about paying for the minutes.

I had to run to Blowes to get supplies for a project I’ll be working on next week. I needed eight wing nuts to hold the U clamps I made from threaded rod. (At a great savings form buying ready made clamps in that size) This is for a club project so I’m doing all I can to keep costs down. I originally bought a box of 25 wing nuts for $6.50. Going through the receipts I thought it would be cheaper to just get separate eight wing nuts.

I returned the box of wing nuts and did some shopping. I needed ant killer, a 2foot length of 5/16 threaded rod, 5/16th washers and the eight nuts.

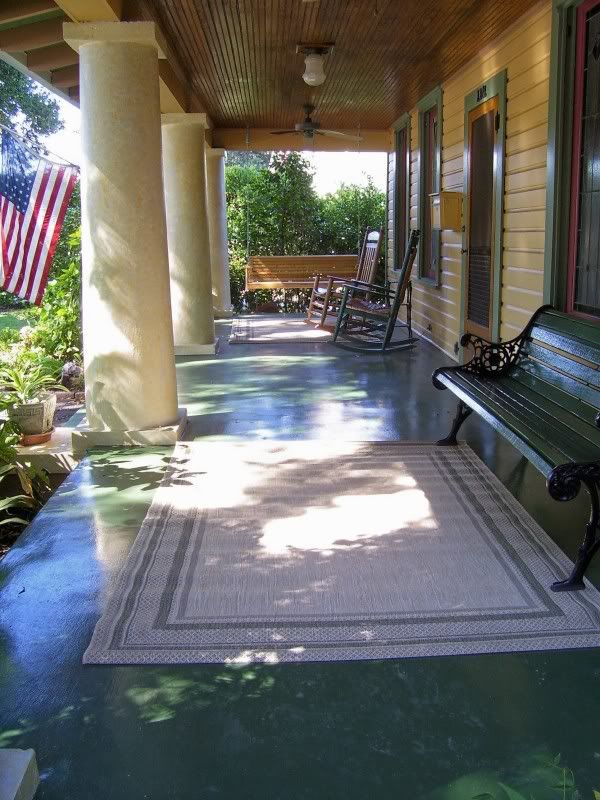
The individual wing nuts were bagged up separately at $1.18 each!!! I ended up buying another box of 25! I wondered if it was the box I had just returned! The clearance rack in the back had outdoor rugs at 75% off. I got two 5’ x 7’ rugs for the front porch at $15.00 each marked down from $45.00.

I guess I did my part to help the economy this Labor Day!

Saturday, September 4, 2010

Working At The Bench: Continued


Friday, September 03, 2010

It has been too long since I’ve worked on a watch. When you are working on a piece of machinery that is 100+ years old there is a lot that can go wrong.

This current gas light clock project is no exception. The major American watch manufacturers: Elgin, Waltham and Hamilton sold their watches in different grades. The movement sizes were standardized. This allowed independent case manufacturers to produce a huge variety of watch cases. Talk about being spoiled… you got to choose the quality watch works you needed and then do the same for a case. The jeweler/watchmaker put it all together: The higher the watch grade, the finer the finish on the movement and components.

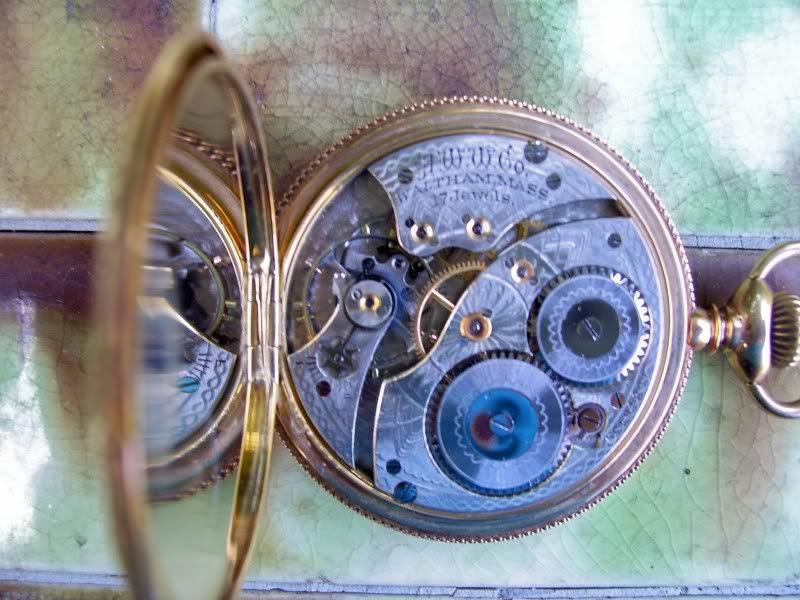
The highest grade Waltham I own is a family piece that once belonged to my Great Uncle Jack. The movement dates from 1906. The wheels and pinions are all highly polished to reduce friction which improves the timekeeping qualities. The pivots ride in jeweled bearings another friction reducer.

I tried my best to get a close up shot of this 12 size watch movement. The damasking on the movement is truly a work of art. It seems incredulous in this day and age such work went into producing a finish that usually never saw the light of day.

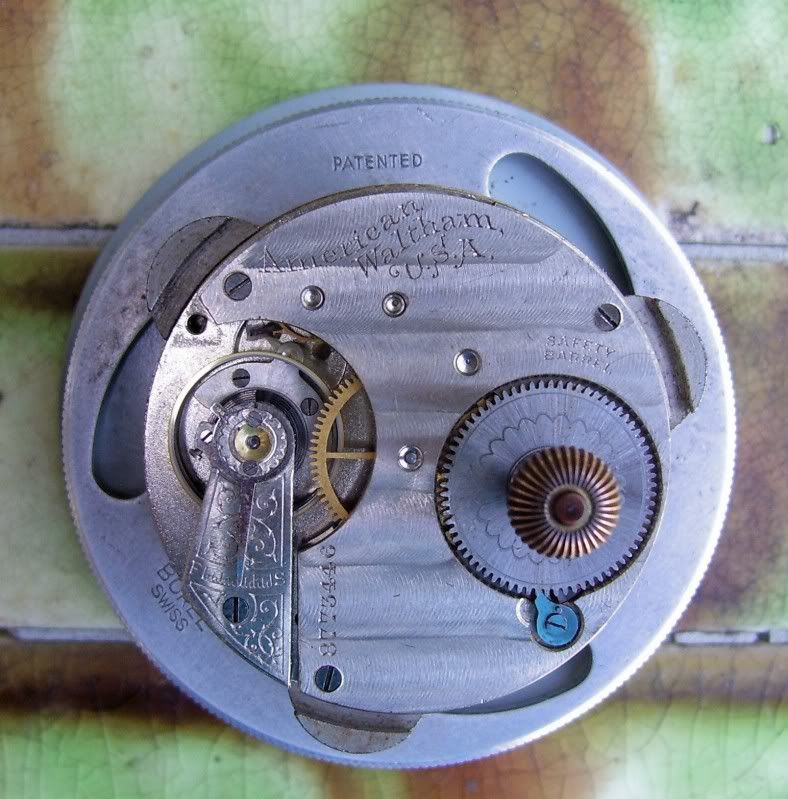
The Gas light clock is the next largest movement size #14. The finish on the parts and movement is quite a contrast to Uncle Jacks watch. This is a 7 jewel movement which was pretty much the lowest grade made by the major watch companies. Hamilton only made a small number of 7 jewel watches deciding early on to concentrate on quality higher grade movements having a minimum of 17 jewels.

The lower balance hole jewel looked to be more of a train jewel and the cap jewel which sits over it looks like the jewel should be reseated. Setting jewels was one of my strong points when learning “general repair” back in the spring of 1971. But, I ‘m pretty certain this works ran with the parts as they are. I don’t need to be making work for myself. The mediocre quality of this piece does not warrant going all out.

The balance was set up and installed and it took right off. That is always a good sign. The steel hairspring had picked up some magnetism which hampered performance. A quick jolt on the demagnetizer fixed that problem.

The balance wheel has a good motion; all in all I’m pretty pleased in how it turned out.

I needed to replace the screws that hold the movement to the glass dial. Searching through my screw assortments I was able to dig up a couple case screws that were long enough. However I had to chuck these screws up in the lathe to turn the heads down to make a good fit into the countersunk brass washers.

The washers had a thin piece of rubber glued to the back which will act as a cushion against the glass. I have been wracking my brain for days on how to cushion the movement to the dial. You can’t glue it, but it needs to be tight so not to shift while winding. The metal against glass is very slick. This was a "novelty piece" that was not a regular production item. I don't think a lot of thought was put into it's original design.

Sorting through my phonograph parts I discovered a rubber diaphragm gasket for an Edison model b reproducer that was the exact size as the outside of the movement. Problem solved! I’ll just spray some contact adhesive to the gasket and install it to the movement. That gasket will hold the movement tight to the glass dial without having to put a lot of strain on the screws and holes drilled in the glass.

That problem solved I finished up working on the movement installing the cannon pinion. This is a hollow pinion that fits tightly over the center wheel that the minute is attached to. It does not fit tight enough. This was a real poor design expecting the thin pinion to grip the center wheel shaft tight enough to hold the heavy clock hand in place. I waxed up a piece of cotton thread and fished it through the pinion. Doing so pushed out a similar shim. Installing that assembly over the center wheel, I now have plenty of friction to hold the minute hand steady.

I’ll run the movement for a day or so before installing the works to the dial. The worst of the work is now done.

I just checked (5:33 p.m. 9/03/2010) and my fire hydrant left salt Lake City, UT and is on it’s way to Denver, CO.

* Saturday morning 5:28. Before posting this entry to E-blogger I checked on the progress of the fire hydrant... it is on it's way from Denver, CO to Memphis, TN .....

Thursday, September 2, 2010

Working At The Bench


The mornings have been so delightfully cool. It was perfect to work in my upstairs workshop as the second floor really heats up during the day.

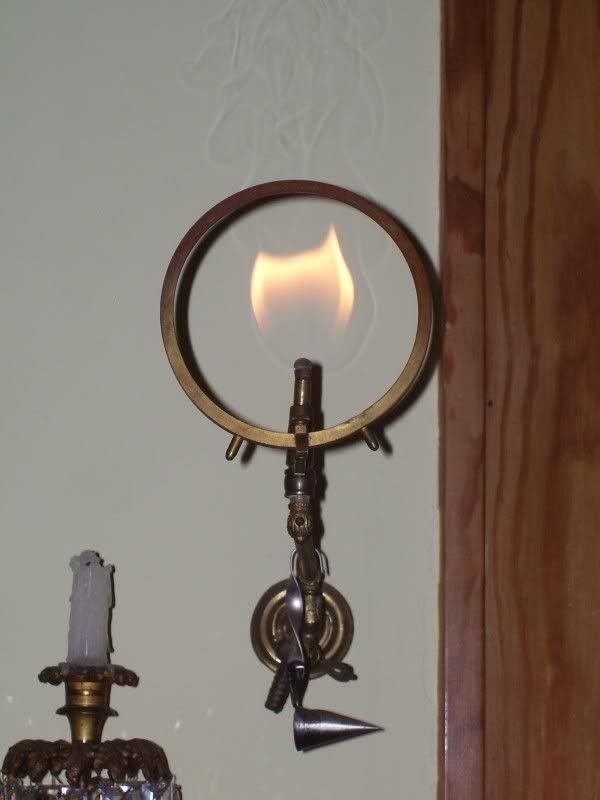
That gas light clock has been driving me crazy to get to work on it. My workbench was a horror show with tools and stuff scattered all over. I needed to start with the heavy stuff first. I don’t have a gas light "burner tube" the clock holder will slip over. There is a slit in the back of the holder, but there is not a lot of play. I don’t need to be fracturing the old brass trying to force it open. It was a simple job to alter a gas “fitting” from a previous application. I wanted to be sure the tube was cut to the proper height to give the most illumination behind the milk glass dial. The trial showed a successful adaptation.

The original finish on the brass fame was a gold wash in a matte effect. I suppose I could clean and then buff the life out of the thing to make it nice and shiny. No… I’m going to keep the finish just as it is.

I took a break going to the “Y” and did an easy 5,000 meters on the Concept 2. The one exercise I really hate to do is the “dead bug”. You lay on your back with both arms and legs straight up. You then slowly lower the right leg and arm for a set number of reps while holding the left arm and leg up. I try to do 20 reps of each side and then ten reps of left leg and right arm and then ten reps of right leg left arm.

From the “Y” I went to the boat house. I took 0000 steel wool and rubbed down the 2nd coat of finish on the gunwales. Wiped it down and applied the third and final coat of Polyurethane. That third coat went on real easy. I can’t do anything more on the shell till it gets turned over and we can get to work cleaning the insides.

Back home I went back to the workshop and tore into that watch movement. I was very careful as this is such an oddball product. There is no way to obtain any parts if needed.

This Waltham 7 jewel watch movement is a “14 size” which was not a big seller. According the serial number this was manufactured around 1898. I lucked out in that there was nothing missing or broken mechanically. The works were so dry….

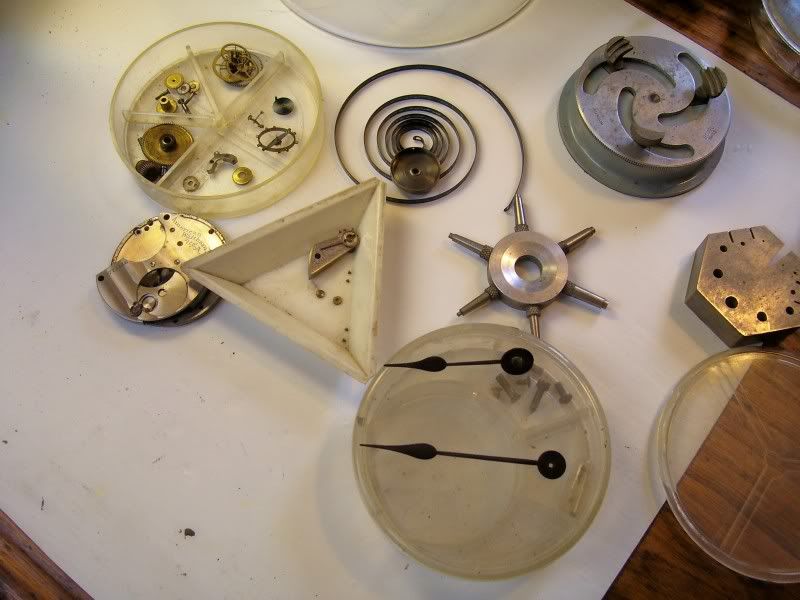
Disassembled and ready for cleaning and polishing

Only having seven jewels it is very important to have the pivots on the wheels as smooth and shiny as possible to cut down on friction. I have a tool I made up in my first month of watchmaking school that I used to polish up the pivots. My instructor always called it a “bell metal slip”. It is a piece of brass that is filed to certain dimensions and angles. Once the main filing was done it was given a finish by doing only one pass on a fine file to give a line finish. It is these lines with abrasive compound that do the polishing. I’ve had to reface this tool many times over the years.

It felt so good to be working at the bench again. I can really get lost doing this kind of work. Once all was polished up, the parts went through the cleaning solution. I so wanted to get this back up and running today, but that was not to be. Instead I just got the mainspring and gear train installed. I reused the old mainspring. It was not “set” too badly. When testing out the gear train it should have “backlash”. You give a couple winds to the mainspring which activates the gears. They should run free and then reverse direction then the mainspring is totally unwound. Good grade watches with a fresh mainspring are pretty amazing where backlash is concerned. This poor thing needs a bit of imagination to see the backlash that is there!

Tomorrow I’ll reinstall the jewels for the balance assembly. The shellac is missing from the pallet stones and roller jewel, so I’ll need to put some fresh on those.

All the time I was working at the bench my newest fire hydrant was traveling. The scheduled delivery day in Birmingham is next Thursday. This morning it was in Reno, Nevada, and the last time I checked it was headed to Salt Lake City!

I know I sound like a broken record, but I still find it so mind boggling I can do things like track the progress of the fire hydrant delivery, send E-mail in an instant to anywhere in the world, and yes maintain an on line journal for the world to see. Life is good…..

Wednesday, September 1, 2010

Boat Shell, Gas Light Clock, and Fire Hydrant


Wednesday, September 01, 2010

Tuesday morning our row was cancelled. So… we were able to get to work on the shell the club is selling to raise money. This poor boat has been on a boat rack exposed to the elements for over a year. We have never had it in the water; it was part of a “deal’ to acquire better boats. It was built in the mid 1980’s having lots of wood in the ribbing and gunwales. It is one heavy boat: Too heavy for a crew of average rowers in our club to carry to the river.

A new restaurant is opening and this shell is to be a display piece. But, it needs to be pretty. The UV exposure and elements have not been kind to the exposed wood. The boat has been stored “upside down” so it is just the exterior of the gunwales that needs to be really worked on. We got the last of the finish stripped off using paint stripper and steel wool Monday.

We started sanding Tuesday morning but it began to rain and we had to call things off around 8:00 a.m. The day cleared and I went back in the afternoon and finished up the rough sanding.

This morning Laurie and Ted helped me do the finish sanding to knock down the “fuzzies”. Ted could not stay long, and Laurie had a class to teach. The wood was too wet to put any finish on. I was just piddling at things when Trish and Tim stopped by. It was an easy decision to go to City CafĂ© for breakfast!

We had such a good time. Tim just got back from a job assignment in Iceland and was telling stories. I was bad and got chicken fried steak and gravy with eggs, grits, and biscuits. I love that meal so!

I went back to the boathouse and put the first coat of polyurethane on the fixed up wood. The sky was clear and the direct sunlight burned away the morning dew. For what it started out as, the wood finished out pretty well. This finish dries in a couple hours. I’ll get back this afternoon, steel wool that first coat down and get the second coat on. Tomorrow we will flip it into stretchers and start cleaning out the inside. It should just take a good cleaning out and maybe a coat of wax on the wood…..

I got home about 10:30 a.m. A package was on the front porch. It was the special glass epoxy glue I had ordered Monday afternoon! Transactions like this just “blow my mind”. Talk about instant gratification: it had not been 48 hours from the time I placed and paid for the glue and it was delivered to my doorstep.

This is what can be so frustrating in doing restoration work. I just needed a little bit of this glue to repair that broken Gas Light clock dial. No other glue would work properly from what I could research. Being able to use the internet as a research tool makes this type of restoration so much easier ….

The glass dial was cleaned with Acetone. A flat piece of foam was covered in clear plastic tape so the glue would not stick if any seeped through to the foam. I first made sure the two glass pieces would align properly. It all looked good. One edge of the glass was coated with the glue and the pieces were joined together. Then I had to expose the glue to direct UV rays outside for 30 seconds to cure it. It all seems to have gone well. The glass seems repaired nice and tight: it is not stuck to the plastic. I will not touch it for 24 hours as that is when it will be totally cured.

I’ve seen a number of these Waltham clocks with the dial cracked in the same general spot. One theory I’ve read is the glass heats up from the open gas flame causing it to break. The gas light clock I’ve owned and used for many years on an open gas flame never heated up to the point of breaking. It is far enough away from the flame to not really heat up much at all.

With this particular clock it is wound from the back using a heavy crown similar to what would be used for a large pocket watch. This crown screws directly to the barrel arbor to wind the clock.

There is a shoulder cut into the crown that sits into the dust cover that fits over the works. This was very tight causing a binding. I can see where somebody was winding the clock and forced it a bit too much causing too much pressure on the screws holding the works to the dial. The screw that was at the break was bent over. To remedy this problemI was able to slip a clock hand washer over the arbor which gives a enough clearance to easily wind the clock and still hold the cover tight.

Now I’m thinking over different ways to reinforce the screw holes in the dial and fabricate a type of thin gasket to cushion the movement to the dial. One thought was to use electrical tape to form a gasket by mounting it to clear plastic tape, sticky sides together.

Craters and Freighters contacted me late Tuesday afternoon. My fire hydrant is all palletized and ready to ship. The shipping weight was 65 pounds heavier over the original weight quote, so it ended up being a bit more money. It should be at the Birmingham docks Wednesday or Thursday next week!! Things are looking good!!!

Another E-Bay Score!


Monday, August 30, 2010

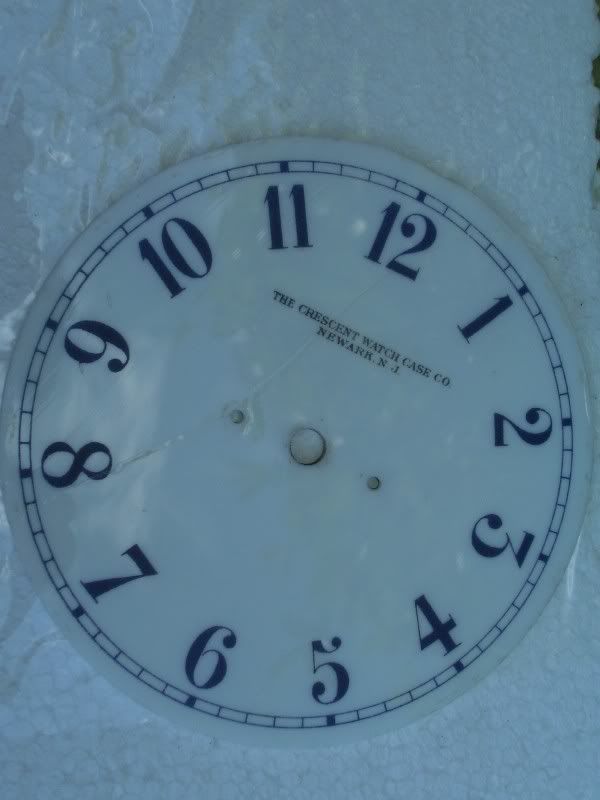
Old E-bay searches die hard. I was killing some time and did a quick E-bay search for “gaslight clock”. The usual results for the past six months has been a bunch of neon clocks and an antique gas light clock with a buy it now price of $795.00 (if I remember right) which has been listed forever. This time I was amazed to see a poorly worded listing with hazy pictures for a beautiful antique gaslight clock: unfortunately the milk glass dial was cracked. There was also a carrying case for the thing. The name on the dial was: The Crescent Watch Case Co. Newark, New Jersey.

The starting bid was for $19.95. It had been bid up to $34.00 when I discovered the listing. The broken dial really takes value off, although it is rare to find this style clock with the dial intact. The clock was not in running condition and there was no picture of the works. I had a gut feeling to put in a bid. This way I can have a gaslight clock in two downstairs rooms of my house. I’ll bet it will be the only house in Alabama with that!

I put in an auction snipe with a maximum bid of $61.98. The last clock of this caliber with a broken dial I followed sold for over $200.00. I was amazed to have won the auction for $39.77. That was at 8:00 p.m. on the 26th. Early Saturday morning I did an instant Pay-pal payment on the thing. It was delivered here to my house this morning at 11:30 a.m.!

You see in a lot of E-bay listings: “this merchandise comes from a smoke free house.” Boy I know why this is stated now. I opened up the cardboard box and it stunk to high heaven of cigarette smoke. It was vile; I threw away the packing materials outside immediately. That bubble wrap won’t get used again!

The clock was housed in a velvet lined case which I now have airing outside. I took the clock to my workshop to carefully dismantle the works from the fragile glass dial. One of the screws holding the works to the dial was bent which tells me the clock was probably getting wound up and too much pressure was put on the winding knob, putting strain on the milk glass dial causing it to crack.

Taking the movement off the dial I was able to tell it was a 7 jewel lever escapement movement. Unscrewing the winding knob the dust cover was able to be removed. I was tickled to see this was an American Waltham watch movement. The balance wheel moves freely and the hairspring has not been messed with. The mainspring has been wound up tight. When mainsprings dry out and get wound up tight, the friction holds spring coils together. Oil is needed to allow the coils to slide apart. This should be an easy straightforward restoration.

This makes sense now….the configuration of the screws on the dial are what Waltham used for their gas light clocks, and Waltham used blue paint for the number colour. I’ll bet the Crescent Watch Case Co just bought a bunch of these clocks and had their name put on the dial. Such a practice was common back then.

There is a special epoxy “crazy glue” just for glass. Here is where I love the internet and can’t imagine being without online access. Instead of driving to all the hardware and big box stores looking for this elusive glue … (it is not carried by HomoDepot or Blowes) I found a source on line with FREE SHIPPING! The glue will be delivered Friday!

This is the kind of deal that works out for me because I have the skill to do the restoration work needed. If I had to have this work contracted out it would not be worth restoring. I’ll be putting this project on the “back burner”. I have a fire hydrant on the way which will take top priority!


Followers

About Me

My photo
Tuscaloosa, Alabama, United States
Retired auto worker who can now spend too much time restoring his 1922 Bungalow Home. I'm involved in a number of varied activities from collecting bricks to rowing with a masters rowing group. This blog is to share different aspects of my life on my Facebook page. I've kept an on-line journal for eight years.