| | | Wednesday, September 01, 2010 |
Tuesday morning our row was cancelled. So… we were able to get to work on the shell the club is selling to raise money. This poor boat has been on a boat rack exposed to the elements for over a year. We have never had it in the water; it was part of a “deal’ to acquire better boats. It was built in the mid 1980’s having lots of wood in the ribbing and gunwales. It is one heavy boat: Too heavy for a crew of average rowers in our club to carry to the river.
A new restaurant is opening and this shell is to be a display piece. But, it needs to be pretty. The UV exposure and elements have not been kind to the exposed wood. The boat has been stored “upside down” so it is just the exterior of the gunwales that needs to be really worked on. We got the last of the finish stripped off using paint stripper and steel wool Monday.
We started sanding Tuesday morning but it began to rain and we had to call things off around 8:00 a.m. The day cleared and I went back in the afternoon and finished up the rough sanding.
This morning Laurie and Ted helped me do the finish sanding to knock down the “fuzzies”. Ted could not stay long, and Laurie had a class to teach. The wood was too wet to put any finish on. I was just piddling at things when Trish and Tim stopped by. It was an easy decision to go to City Café for breakfast!
We had such a good time. Tim just got back from a job assignment in
I went back to the boathouse and put the first coat of polyurethane on the fixed up wood. The sky was clear and the direct sunlight burned away the morning dew. For what it started out as, the wood finished out pretty well. This finish dries in a couple hours. I’ll get back this afternoon, steel wool that first coat down and get the second coat on. Tomorrow we will flip it into stretchers and start cleaning out the inside. It should just take a good cleaning out and maybe a coat of wax on the wood…..
I got home about 10:30 a.m. A package was on the front porch. It was the special glass epoxy glue I had ordered Monday afternoon! Transactions like this just “blow my mind”. Talk about instant gratification: it had not been 48 hours from the time I placed and paid for the glue and it was delivered to my doorstep.
This is what can be so frustrating in doing restoration work. I just needed a little bit of this glue to repair that broken Gas Light clock dial. No other glue would work properly from what I could research. Being able to use the internet as a research tool makes this type of restoration so much easier ….
The glass dial was cleaned with Acetone. A flat piece of foam was covered in clear plastic tape so the glue would not stick if any seeped through to the foam. I first made sure the two glass pieces would align properly. It all looked good. One edge of the glass was coated with the glue and the pieces were joined together. Then I had to expose the glue to direct UV rays outside for 30 seconds to cure it. It all seems to have gone well. The glass seems repaired nice and tight: it is not stuck to the plastic. I will not touch it for 24 hours as that is when it will be totally cured.
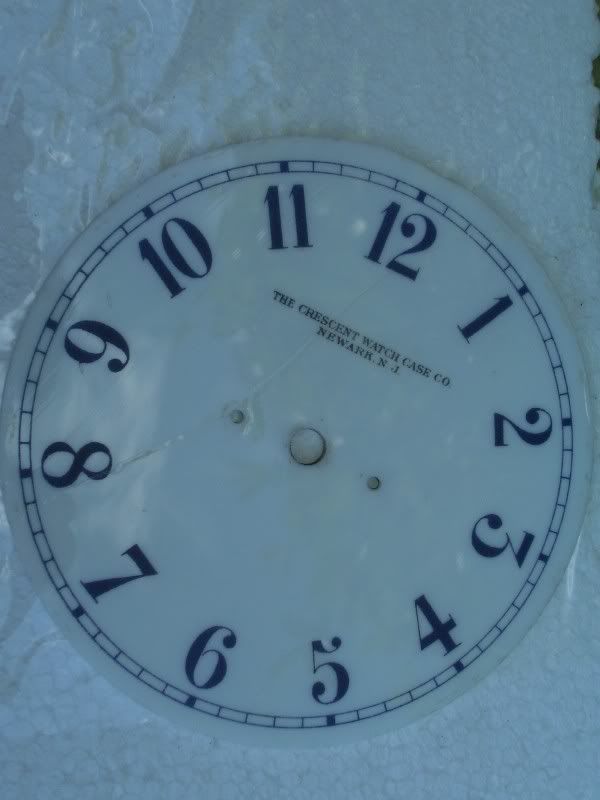
I’ve seen a number of these
With this particular clock it is wound from the back using a heavy crown similar to what would be used for a large pocket watch. This crown screws directly to the barrel arbor to wind the clock.
There is a shoulder cut into the crown that sits into the dust cover that fits over the works. This was very tight causing a binding. I can see where somebody was winding the clock and forced it a bit too much causing too much pressure on the screws holding the works to the dial. The screw that was at the break was bent over. To remedy this problemI was able to slip a clock hand washer over the arbor which gives a enough clearance to easily wind the clock and still hold the cover tight.
Now I’m thinking over different ways to reinforce the screw holes in the dial and fabricate a type of thin gasket to cushion the movement to the dial. One thought was to use electrical tape to form a gasket by mounting it to clear plastic tape, sticky sides together.
Craters and Freighters contacted me late Tuesday afternoon. My fire hydrant is all palletized and ready to ship. The shipping weight was 65 pounds heavier over the original weight quote, so it ended up being a bit more money. It should be at the


Not sure if my previous comment attempts were successful.... But here is another!
ReplyDeleteI stumbled upon your blog while searching for Waltham gaslight clocks. I must say, I am thoroughly impressed by your blog! I enjoy it. I am hoping to snag a gaslight clock on eBay, and it appears that the dial will need a lot of love (maybe more than mere mortals can give...). I was wondering, what dial glue did you use?
By the way, I am envious of your house! It seems quite awesome!
-Donald